This document is a step-by-step guide on how to use the ShopV2 module to create a shop.
Table of Contents
1. Pre-requisites
1.1 Payment methods, VAT and Currencies
2. Setting up the Catalog
2.1 Creating Categories
2.2 Creating Article Attributes
2.3 Creating Articles
2.3.1 Article Details
2.3.2 Article Attributes
2.3.3 Article Images
3. Configuring the Shop
3.1 General options
3.2 Display settings
3.3 Menu settings
3.4 Reviews
4. Setting up the Shop Blocks
5. Final Configurations
5.1 Enable Articles
5.2 Enable Categories
1. Pre requisites
1.1 Payment methods, VAT and Currencies
Before you can sell anything, you need to configure the Billing Management in your CMS.
For more details, please see Billing Management in the wiki.
2. Setting up the Catalog
2.1 Creating Categories
First, we have to define categories in which articles will belong. Let's create a shop that sells "Writing Stuff" and "Precious Gifts". To do so, go to the Categories tab in the eCommerce module administration.
Then, click the "Add" button. The Category creation form appears:
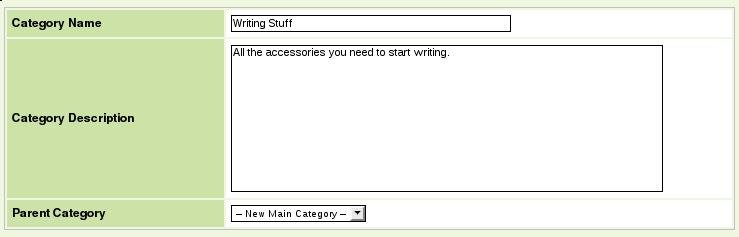
Just enter the Category name and description. You can optionally set a Parent Category if you want to have a hierarchy of categories (for instance: Clothes/Men/T-Shirts). Then, click the "Submit" button.
The Image field appears so that you can optionally add an image to illustrate the Category. Just click on the 'Upload Image' button. A pop-up window appears and lets you upload an image from your computer. Click the 'Browse' button to select the picture and validate your choice. Then click 'Attach' to transfer the picture to our servers.
You may use these public domains pictures as Category Images:
| http://www.publicdomainpictures.net/view-image.php?picture=pencilℑ=3348 http://www.publicdomainpictures.net/view-image.php?picture=jewellery-heartℑ=1612 |
Exercise: Repeat these steps so as to create to 'Precious Gifts' category.
After, you can click on the 'Categories List' tab. Here is what you should see:
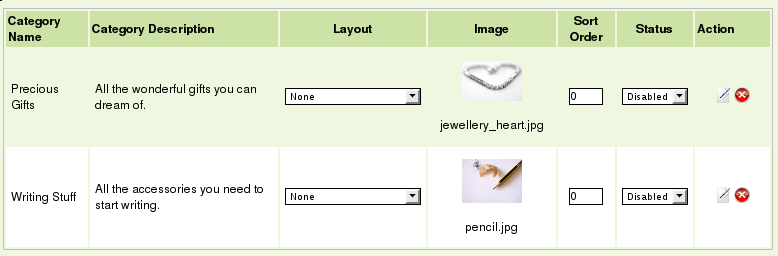
Do not worry if both Categories have the 'Disabled' status, as we will come back later here. Now let's move on to the next part.
2.2 Creating Articles Attributes
You may want to sell articles that have Attributes. For instance, the Size if you sell clothes, or the Color if you sell cars. In our example, we will create two Attributes that will go along our 'Notebook' article.
To do so, go to the Attributes tab. The Attributes List is empty at the moment. Fill in the "Add a new attribute" text field and press the "Add" button:

The newly created Attribute appears in the List:

As we can see, there are no attribute values defined yet. To add them, click the "Edit" button in the "Action" column. This will take us to the Attribute Values tab.
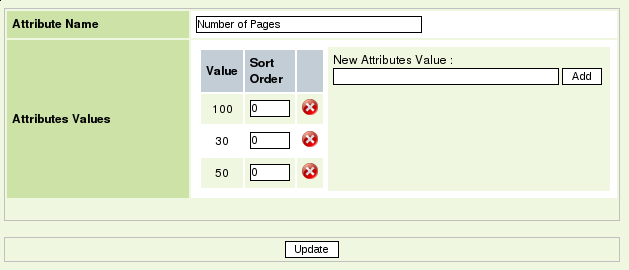
Use the field "New Attributes Value" to type in the possible values (i.e. "30", "50" and "100"). Click Add to save each value. The contents of the tab should look like this:
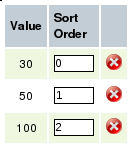
We notice that the values are in random order (100, then 30, and finally 50). Let's define the order in which they will be shown to the customers. Just fill in the Sort Order column with the expected Order of appearance and press the "Update" button. We now have a correct order:
Exercise: Repeat the steps above to create the Attribute "Paper Quality" which has the following values : "80 grams", "160 grams", "300 grams".
2.3 Creating Articles
Go to the Articles tab. You will see an empty Articles List. Let's populate it. Click the 'Add' button. The Article Details Form appears.
2.3.1 Article Details
Here you may type:
- Article Nr. : Reference of the Article inside your company (ex: A0012) - Article Name : The Name that will be shown to customers - Article Short Description : a simple text field of 250 characters to describe the Article - Article Long Description : a full-featured HTML description which you can create using the WYSIWYG editor. You may for instance insert bullets lists, pictures, and tables here. - Article Extra Information : In the free text field, you may enter extra information about the article, such as the price per liter or per kg. Depending on the Display Settings (see paragraph 3.2), this information can be printed on the bill and order confirmation. - Article Price : The Price of the Article in the Reference Currency (see Billing Management on the Reference/Secondary Currencies topic) - All Tax Included : Specifies if the Price above includes the VAT or not - Special Price : You may want to give the Article a Special Price. If so, enter it here. - Apply Order-level Discount : We will discuss the Discounts later, but this enables you to discount this Article based on the sum of bought Articles net price in an Order. - Weight (kg) : This is used in the Shipping Costs calculation - VAT Group : Here you can choose which VAT Group this Article belongs to (depending on your country, if might not be the same for food, electronics, etc...) - Article Categories : The Category (or multiple Categories) this Article belongs to. - Additional Shipping Policy : Optionally, you can associate an additional Shipping Policy to this article (i.e. "Fragile" for items that need careful handling). We will discuss Shipping Policies later. |
Let's create the "Notepad" article with the following data:
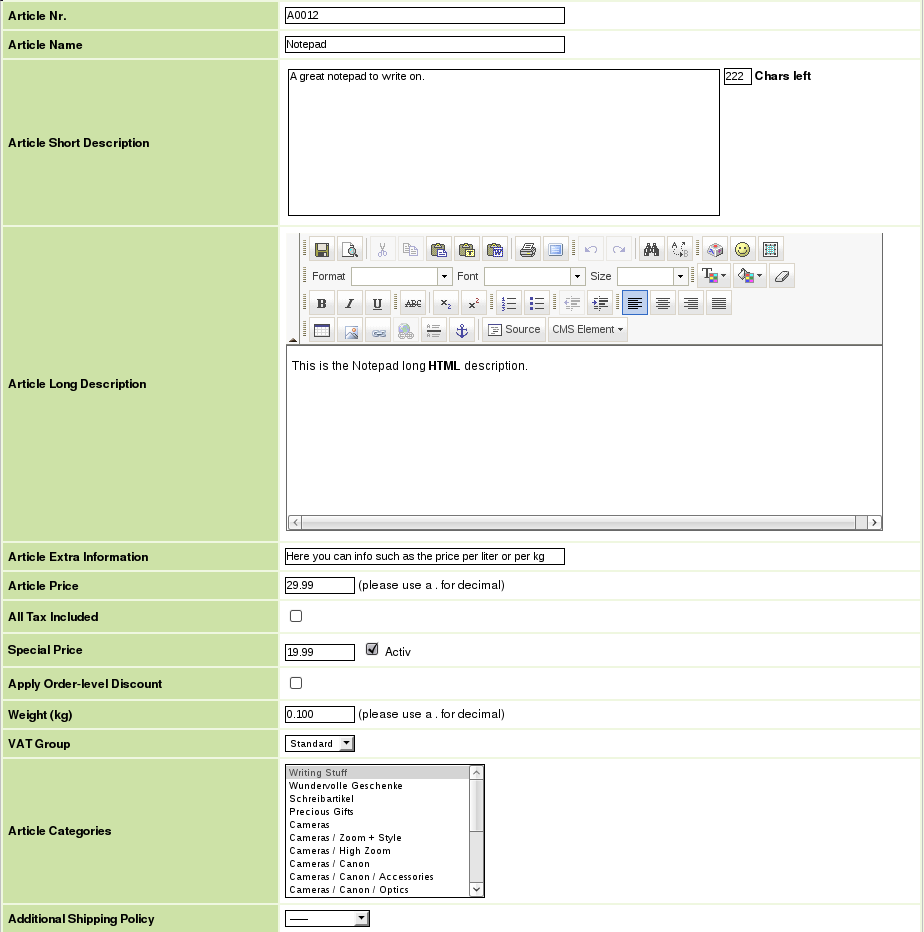
When done typing all the data for the article, click the "Update" button.
2.3.2 Article Attributes
We can now assign to our 'Notepad' article the Attributes that we created before. Let's go to the "Article Attributes" tab. Use the "Add new attribute" drop-down list to select "Number of Pages" attribute and click the "Add" button to assign it to the article.

Repeat this for the "Paper Quality" attribute.
The Attribute Values list should look like this:

Let's set the Price for the Values of "Number of Pages" Attribute. Click on the "+ Magnifier" symbol at the left of '0 Attributes Values'. The "Add" Button appears:

Explanation:
Setting a
"+" means, that you add an extra amount to the standard price of an article (i.e. because a notepad has 20 more pages than the cheaper one)
"-" is for granting a price reduction (Example: The standard price of a notepad is 5,00 EUR - when the customer buys a small notepad, he gets a reduction of 2 EUR, so he just pays 3 EUR. To set this up you add "-" and 2.00 EUR.
For the "30 pages" notepad, we will set a price of "-10".
Click "Add" to save the settings, and repeat these steps to set "50 pages" to a price of 0 and "100 pages" to a price of +10. You should now see this:
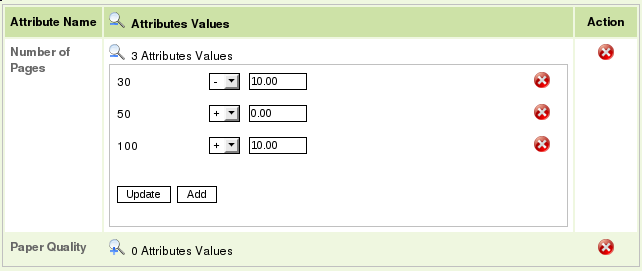
We now have set the Prices for each Value of the "Number of Pages" Attribute.
Exercise: Repeat the steps above to set the Prices for each Value of the "Paper Quality" Attribute.
2.3.3 Article Images
We can now move on to associate an image to the Article. Click on the "Article Images" tab. Then, click the "Upload" button just under the "Add new image" label.

Use "Browse" then "Attach" buttons in the "Worldsoft CMS Uploaded" popup window so as to transfer the image from your computer to our servers. For example, you may use this image from public domain:
| http://www.publicdomainpictures.net/view-image.php?picture=notepadℑ=1394 |
The Image List now looks that way:
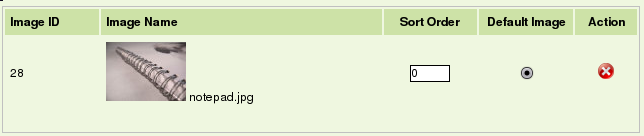
You can add more images if you want to create a gallery for your article. Just make sure you select the image you want to be first shown to the customers as "Default Image". To do this, click on the "Default Image" radio button on the line corresponding to the image you want to set as Default, then click the "Update" button.
Exercise: Create the "Colorful Pencil", "Wedding Ring" and "Bracelet" Articles, associate them to the right Category, and give them Images. You may use these images from public domain:
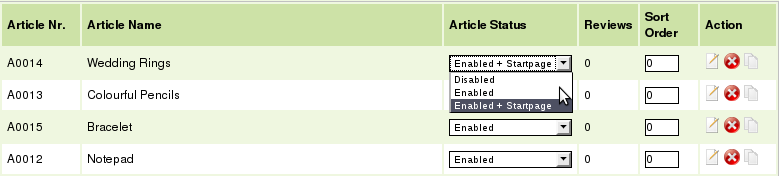
When done, the Articles List should look like follows:
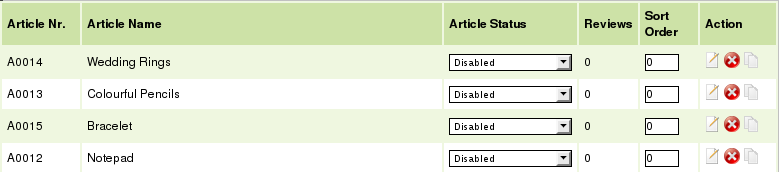
A short comment on the colums:
- Article Nr. : As entered in the Article Details - Article Name : As entered in the Article Details - Article Status : Can be Enabled/Enable + Start Page/Disabled. Please see the chapter "Final Configuration : Enabling Articles" for more details. - Reviews : The number of reviews (i.e. Comments) that this Article has received. Moderation is done within the "Comments" CMS-tab. - Sort Order : The order in which the articles shall appear in lists (Ascending order is used) - Action : Using the buttons here, you may Edit, Delete or Clone (i.e. Duplicate) an Article |
3. Configuring the Shop
Here we will see how to define the way the Shop works and behaves, so that you can fine-tune it to your specific needs.
3.1 General Options
To navigate to the "General Options", choose the tab "Configuration".
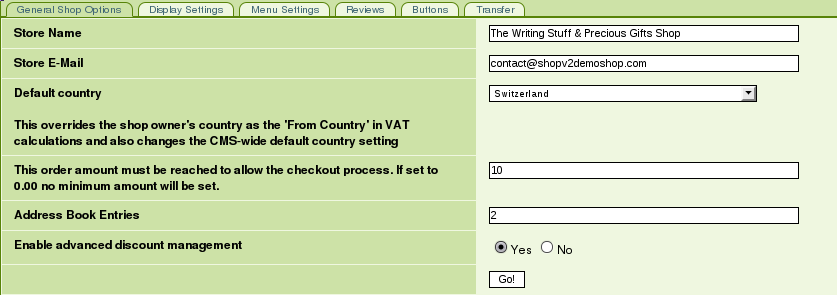
Store Name : Used as the Sender name (i.e. 'From') in the Order Confirmation Email. This is also the Recipient Name of the shop owner's copy of the Order Confirmation Email. Store E-mail : Used as the Sender E-mail (i.e. 'From') in the Order Confirmation Email. This is also the address to which a copy of the Order Confirmation Email will be sent. Default Country : If not set, the Shop will use the Shop owner's Country as the 'From' Country in VAT calculations. If set, the selected country will be used instead. Minimum Order Amount : Sets the minimum Grand Total Net Amount of an Order so that it can be actually confirmed. Address Book Entries : Maximum number of entries allowed in the customer's Address Book Advanced Discount Management : Turns on/off the Advanced Discount Features (i.e. Article-level Discount Policies) |
3.2 Display Settings
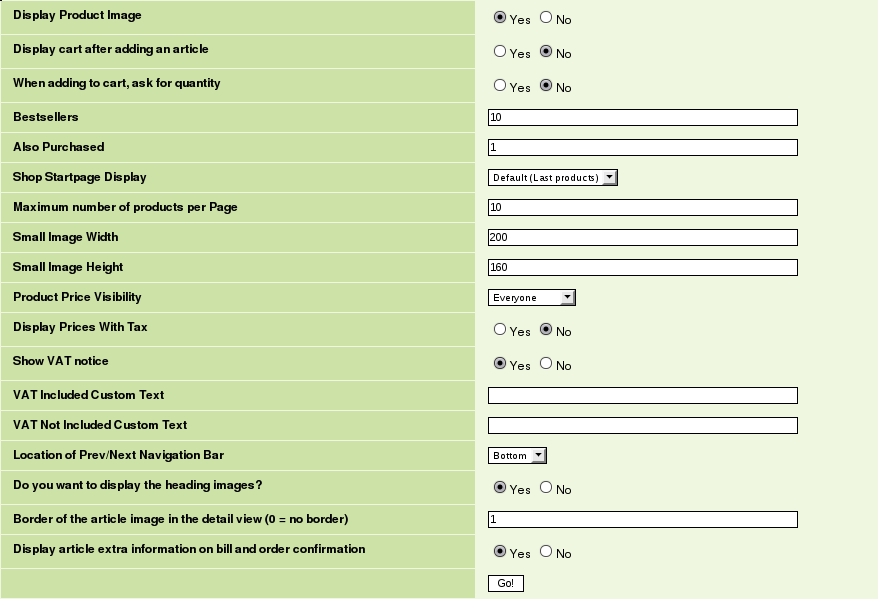
Display Product Image : Allows you to toggle on/off all Article Images in the Shop
Display cart after adding an article : Defines if the customer should be shown the Shopping Cart page after buying an article
When adding to cart, ask for quantity : In the Article Overview, defines whether the "Add to Cart" button shall change,
                                        after being clicked, to a small form allowing the user the choose Quantity and Options.
Bestsellers : Maximum number of articles to display in the Bestsellers block.
Also purchased : Maximum number of articles to display in the Also Purchased list.
Shop Startpage Display : Defines which Articles should be displayed on the Start Page. Can be :
                         - The last added articles
                         - The articles that belong to a specific category
                         - The articles that are set as "Enabled + Start Page"
Maximum number of products per Page : Self-explanatory
Small Image Width : Default Width of the Thumbnails
Small Image Height : Default Height of the Thumbnails
Product Price Visibility : Defines which users can see the prices (can be : everyone, logged users only, or no one)
Display Prices with Tax : Defines if the prices should be shown with or without VAT
Show VAT Notice : When enabled, a short text will be displayed to customers alongside prices, to specify if the prices they
see include VAT or not.
VAT Included Custom Text : When set, this text will be used as the VAT Notice if the prices are displayed with VAT
VAT Not Included Custom Text : When set, this text will be used as the VAT Notice if the prices are displayed without VAT
Location of Prev/Next Navigation Bar : When the number of articles to display exceed the Maximum number of products per page,
a Paginator is used. This setting specifies whether the Paginator should be displayed on the Top, on the
Bottom, or Both.
Do you want to display the heading images : When enabled, small illustrative images are shown on the top of specific pages
(Cart Contents, Delivery Information, etc...)
Border of the article image in the detail view : Default width, in pixels, of the Article Image border in the Article Details layout.
Display article extra information on bill and order confirmation : If set to yes, the "Extra information" field of the Article Details
will be printed in both the Order Confirmation and the Bill.
|
3.3 Menu settings
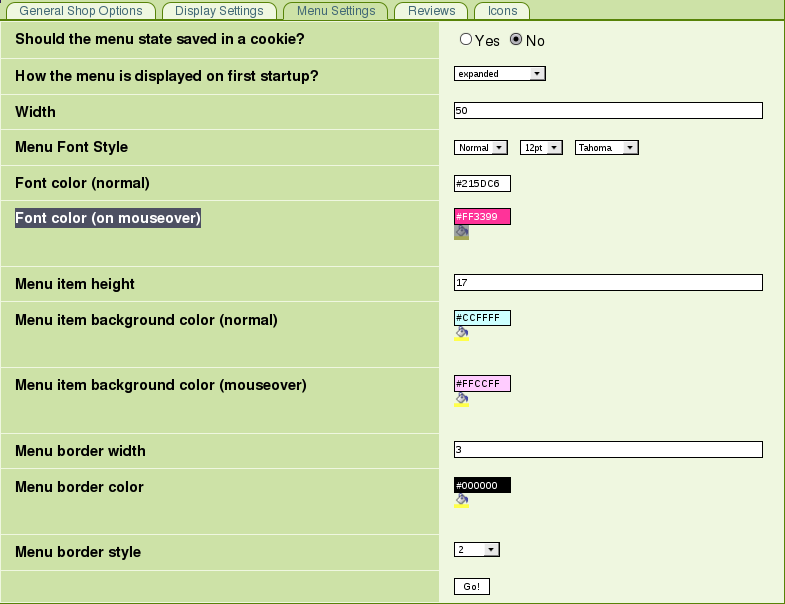
Should the menu state be saved in the cookie : If set, the customer will find the menu in the same state when he comes
                                               back after a visit
How the menu is displayed on first startup : If set to "Expanded", all the hierarchy of categories and subcategories will
                                             be shown by default.
                                             "All not Expanded" means only the main categories will be shown.
Width : The width of the Menu Block
Menu Font Style : Here you can customize the font that is used to display the menu
Font color (normal) : Text color when the mouse is not located over the item
Font color (on mouseover) : Text color when the mouse is located over the item
Menu item height : Defines the height of each Menu Item
Menu item background color (normal) : Background color when the mouse is not located over the item
Menu item background color (mouseover) : Background color when the mouse is located over the item
Menu border width : Thickness of the Menu Border, in pixels
Menu border color : Self-explanatory
Menu border style : Here you can choose among a few styles of the Menu Border
|
3.4 Reviews
In this tab you can allow reviews (i.e. comments) on Articles.
The moderation rules are also set here, you can choose between the following policies:
- Comments are always approved
- Comments by registered users are always approved
- All comments need to be approved by administrator
4. Setting up the Shop Blocks
To enhance the shopping experience and accessibility, you may use the Shop Blocks in your website's navigation.
To do so, go to the "Navigation" part of the CMS-Admin:

Then open the "Blocks" tab:
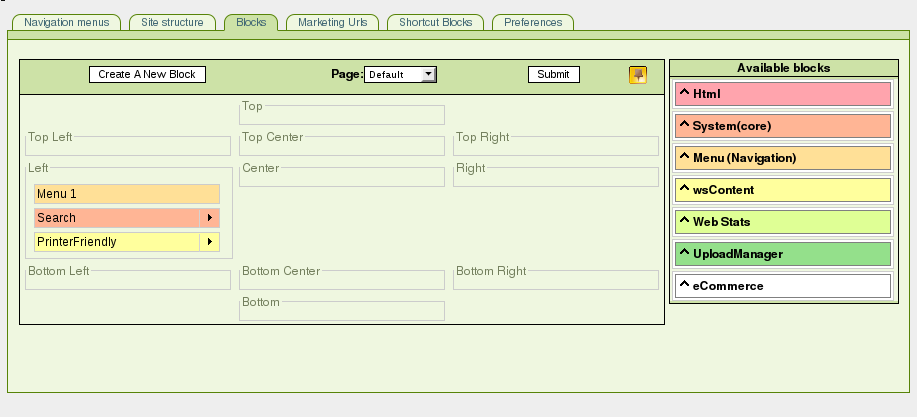
Click on "eCommerce" in the Available Blocks section. You may now drag and drop the following blocks into your navigation:
- Basket : Displays the contents of the Basket (i.e. Shopping Cart)
- Bestsellers : Shows a list of best selling articles in your shop
- Browse History : Shows a history of pages visited in your shop
- Categories : This is the Menu that we configured in the Chapter 3.3.
               It Allows the user to quickly switch between your shop's Categories
- Currencies : Allows the user change currency for display (see Currencies in Billing Management).
               Price conversion is handled automatically by the Shop.
               NOTE: The selection is also used to define the currency in which the customer's Order is made
|
5. Final configuration
5.1 Enable Articles
To make the Articles visible to the customers, we have to enable them. To do so, open the Articles List. The Article Status column features a drop-down list which you can use to select the right status for each Article.
5.2 Enable Categories
So that the Categories may be accessible to the customers, they have to be enabled. This is done in the Categories List:

The enabling of a Category is done using the drop-down menu in the "Status" column:
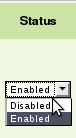
Using this method, let's enable the "Precious Gifts" and "Writing Stuff" Categories that were created in an previous exercise.
Congratulations ! Your shop is now operational. You may now want to read documentation on advanced topics such as Layouts, Buttons, Discounts, etc...